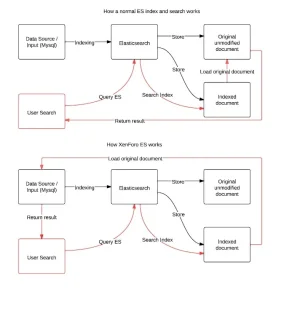
Basic Elasticsearch Installation (RHEL / SUSE)
@Floren has an amazing repo for RHEL 6 and 7, the Elasticsearch RPM he provides is perfectly set up and currently I suggest using it.
The old manual setup guide can be found below.
Step 1) Install the Axivo Repo: https://www.axivo.com/resources/repository-setup.1/
Step 2) Install ElasticSearch: https://www.axivo.com/resources/elasticsearch-setup.11/
This guide is provided to show how to do a basic (vanilla get up and go) install of Elasticsearch (0.90.0 Beta 1), the Elasticsearch Service Wrapper and the required Java Runtime Environment (JRE) (1.7.0_17) on RHEL / SUSE. This guide will not cover running a dedicated Elasticsearch user.
For Debian/Ubuntu users, a guide can be found here.
This guide assumes the user has basic knowledge of SSH and prior to starting the steps below has logged in as root. This guide also assumes the user does not currently have any JRE installed. You can check if you have JRE installed by typing
As of writing, the current file locations for JRE are as follows:
32 bit
64 bit
The guide will be shown using the 64 bit install, however if you are using a 32 bit system, change the file names as appropriate.
Please note, whilst this is a simple and easy setup, I take no responsibility for any damages or losses that may occur to your system by following the steps below. If you are unsure at any stage, please ask for assistance or seek the help of a qualified Linux Systems Administrator.
Installing the JRE
Type the following commands into your SSH terminal.
Assuming everything was done correctly, you should get the following output.
Install Elasticsearch
Install the Elasticsearch Service Wrapper
Assuming everything was done correctly, you should see the following output.
Basic Configuration
You should do some basic configuration of Elasticsearch before installing the addon in XenForo.
1) Open up /elasticsearch/config/elasticsearch.yml and on line 32 edit
To
on line 199 edit
to
On line 211 edit
to
Save and Close
2) Open up /elasticsearch/bin/service/elasticsearch.conf on line 2 edit
To a number suitable for the size of your forum.
I reccomend approximately 1 GB for the HEAP_SIZE per 1 million posts on your forum.
1 Million Posts: 1024
2 Million Posts: 2048
3 Million Posts: 3072
4 Million Posts: 4096
etc
This will not mean the service will use all that available memory, however it will have it at its disposal if required.
So for example a 3 Million Post forum would edit
to
Save and Exit.
3) Optional - Move the Elasticsearch data directory.
Your linux install may be configured in such a way that your install partition is only a few Gb in size, and placing a large Elasticsearch index there is not ideal.
In which case you will want to move the index directory to a different, larger, location (in this example /var/elasticsearch)
Open up /elasticsearch/config/elasticsearch.yml on line 143 edit
to
Save and Exit
4) Restart the Elasticsearch Service
In SSH type
You should get the following output
Elasticsearch is now runing with your updated config.
Install the XenForo Enhanced Search Addon
1) Turn your board off into maintainance mode*
2) Download the addon from your customer area at http://xenforo.com/customers/
3) Follow the instructions found at http://xenforo.com/help/enhanced-search/
4) Wait for your indexes to be rebuilt
5) Open your board.
6) Install the index pre-warmer.
As of 0.90.0 Beta an index pre-warmer is available. This keeps your search index "warm" in active memory so when a search is done, the access time latency is highly reduced.
Installing this is simple, in SSH simply run the following replacing the *INDEX NAME* with the name of your ES index.
You should have the following returned
*You may leave your board open during the re-index process.
Congratulations. Your board should now be running XenForo Enhanced Search.
For Debian/Ubuntu users, a guide can be found here.
This guide assumes the user has basic knowledge of SSH and prior to starting the steps below has logged in as root. This guide also assumes the user does not currently have any JRE installed. You can check if you have JRE installed by typing
Code:
java -versionAs of writing, the current file locations for JRE are as follows:
32 bit
Code:
http://download.oracle.com/otn-pub/java/jdk/7u17-b02/jre-7u17-linux-i586.rpm64 bit
Code:
http://download.oracle.com/otn-pub/java/jdk/7u17-b02/jre-7u17-linux-x64.rpmThe guide will be shown using the 64 bit install, however if you are using a 32 bit system, change the file names as appropriate.
Please note, whilst this is a simple and easy setup, I take no responsibility for any damages or losses that may occur to your system by following the steps below. If you are unsure at any stage, please ask for assistance or seek the help of a qualified Linux Systems Administrator.
Installing the JRE
Type the following commands into your SSH terminal.
Code:
cd /tmp
wget http://download.oracle.com/otn-pub/java/jdk/7u17-b02/jre-7u17-linux-x64.rpm
rpm -ivh jre-7u17-linux-x64.rpm
java -version
Assuming everything was done correctly, you should get the following output.
Code:
# java -version
java version "1.7.0_17"
Java(TM) SE Runtime Environment (build 1.7.0_17)
Java HotSpot(TM) 64-Bit Server VM (build 22.0-b10, mixed mode)
Install Elasticsearch
Code:
cd /
curl -L -O -k https://download.elasticsearch.org/elasticsearch/elasticsearch/elasticsearch-0.90.0.Beta1.zip
unzip elasticsearch-0.90.0.Beta1.zip
mv elasticsearch-0.90.0.Beta1 elasticsearch
Install the Elasticsearch Service Wrapper
Code:
curl -L -k http://github.com/elasticsearch/elasticsearch-servicewrapper/tarball/master | tar -xz
mv *servicewrapper*/service elasticsearch/bin/
elasticsearch/bin/service/elasticsearch install
ln -s `readlink -f elasticsearch/bin/service/elasticsearch` /usr/local/bin/rcelasticsearch
rcelasticsearch start
Assuming everything was done correctly, you should see the following output.
Code:
rcelasticsearch start
Starting ElasticSearch...
Waiting for ElasticSearch......
running: PID: xxxxx
Basic Configuration
You should do some basic configuration of Elasticsearch before installing the addon in XenForo.
1) Open up /elasticsearch/config/elasticsearch.yml and on line 32 edit
Code:
# cluster.name: elasticsearchTo
Code:
cluster.name: PUT-SOMETHING-UNIQUE-HEREon line 199 edit
Code:
# network.host: 192.168.0.1to
Code:
network.host: 127.0.0.1On line 211 edit
Code:
# http.port: 9200to
Code:
http.port: 9200Save and Close
2) Open up /elasticsearch/bin/service/elasticsearch.conf on line 2 edit
Code:
set.default.ES_HEAP_SIZE=1024To a number suitable for the size of your forum.
I reccomend approximately 1 GB for the HEAP_SIZE per 1 million posts on your forum.
1 Million Posts: 1024
2 Million Posts: 2048
3 Million Posts: 3072
4 Million Posts: 4096
etc
This will not mean the service will use all that available memory, however it will have it at its disposal if required.
So for example a 3 Million Post forum would edit
Code:
set.default.ES_HEAP_SIZE=1024to
Code:
set.default.ES_HEAP_SIZE=3072Save and Exit.
3) Optional - Move the Elasticsearch data directory.
Your linux install may be configured in such a way that your install partition is only a few Gb in size, and placing a large Elasticsearch index there is not ideal.
In which case you will want to move the index directory to a different, larger, location (in this example /var/elasticsearch)
Code:
cd /var
mkdir elasticsearch
Open up /elasticsearch/config/elasticsearch.yml on line 143 edit
Code:
# path.data: /path/to/datato
Code:
path.data: /var/elasticsearchSave and Exit
4) Restart the Elasticsearch Service
In SSH type
Code:
rcelasticsearch restartYou should get the following output
Code:
rcelasticsearch restart
Stopping ElasticSearch...
Stopped ElasticSearch.
Starting ElasticSearch...
Waiting for ElasticSearch......
running: PID: xxxxx
Elasticsearch is now runing with your updated config.
Install the XenForo Enhanced Search Addon
1) Turn your board off into maintainance mode*
2) Download the addon from your customer area at http://xenforo.com/customers/
3) Follow the instructions found at http://xenforo.com/help/enhanced-search/
4) Wait for your indexes to be rebuilt
5) Open your board.
6) Install the index pre-warmer.
As of 0.90.0 Beta an index pre-warmer is available. This keeps your search index "warm" in active memory so when a search is done, the access time latency is highly reduced.
Installing this is simple, in SSH simply run the following replacing the *INDEX NAME* with the name of your ES index.
Code:
curl -XPUT localhost:9200/*INDEX NAME*/_warmer/warmer_1 -d '{
    "query" : {
        "match_all" : {}
    }
}'
You should have the following returned
Code:
{"ok":true,"acknowledged":true}*You may leave your board open during the re-index process.
Congratulations. Your board should now be running XenForo Enhanced Search.
Last edited:

